• Skip to main content
  • Skip to primary sidebar
Modern Life Daily

Paula Deen Salisbury steak copycat recipe

March 7, 2024 by Tanya Leave a Comment

Paula Deen Salisbury steak copycat recipe is perfect for a weeknight dinner but can also be dressed up for a more formal meal. It's a testament to the power of simple ingredients, coming together to create a dish that's hearty, flavorful, and deeply satisfying.

paula deen salisbury steaks with green peas and mashed potatoes on the plate
[feast_advanced_jump_to]

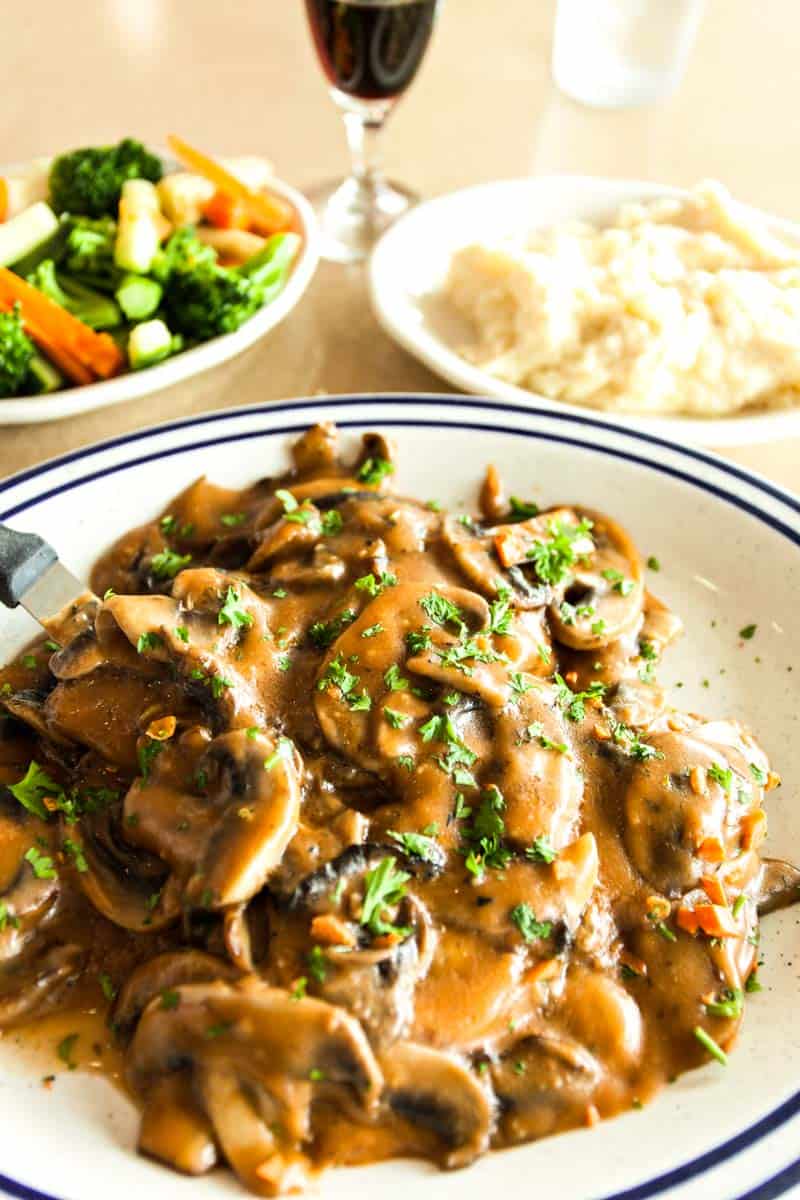
Salisbury steak is a delicious and comforting meal that transforms humble ground beef into something truly special. The dish's origin is American, named after Dr. J.H. Salisbury, who was a proponent of a meat-centered diet. The recipe typically involves seasoned ground beef patties smothered in a rich mushroom gravy, often served with sides like mashed potatoes or green beans for a complete meal​

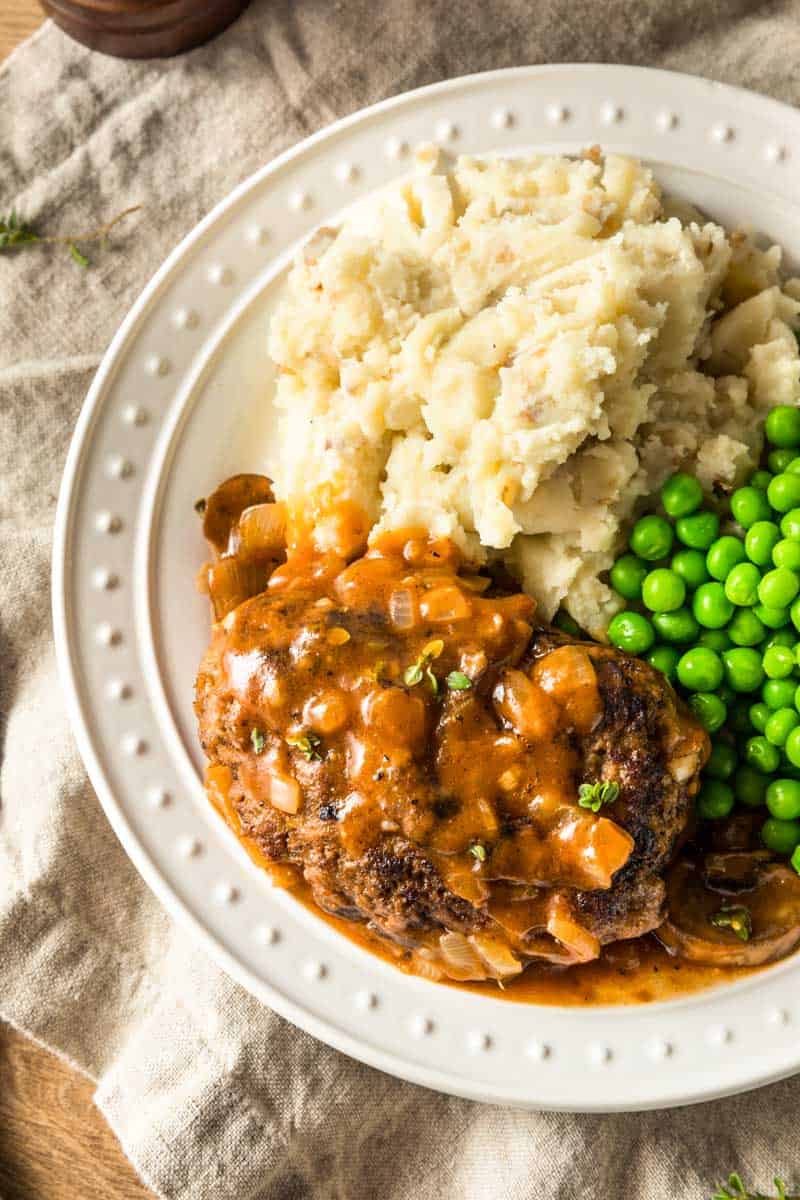
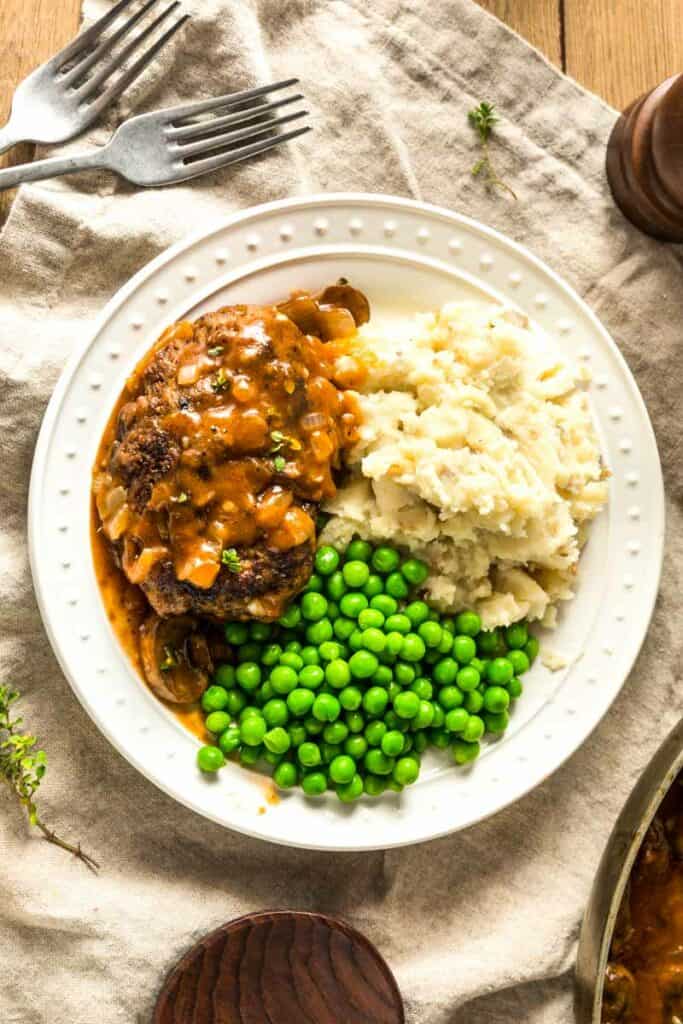
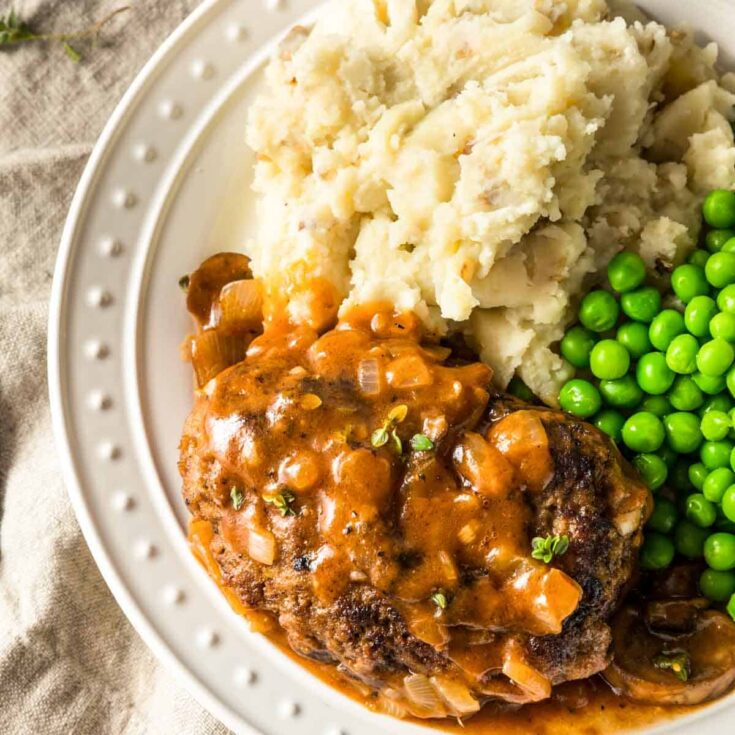
The process of making Salisbury steak involves mixing ground beef with ingredients like breadcrumbs, eggs, ketchup, and seasonings to form patties. These patties are then browned and cooked in a savory mushroom gravy, which not only adds flavor but also ensures the steaks are tender and juicy​​.

A unique tip for extra tasty and tender patties is to grate onion directly into the breadcrumbs, allowing them to soak for a few minutes before mixing with the other patty ingredients​

Salisbury steak can be adapted using different types of ground meat, such as turkey, for a variation on the classic recipe​​. For those looking to store or prepare the dish in advance, Salisbury steak and gravy can be frozen for future meals, either by freezing the uncooked patties and gravy separately or freezing leftovers after cooking​​.

Recipe ingredients

  1. Ground Beef: This is the main part of the Salisbury steak. It's the meat that gets shaped into patties. Ground beef makes the dish filling and flavorful.
  2. Dry Bread Crumbs: These help keep the beef patties together so they don't fall apart when you cook them. They soak up some of the juices from the meat, keeping the patties moist.
  3. Large Egg: The egg acts like glue for the meat mixture. It helps stick everything together so that when you shape your patties, they stay as patties.
  4. Worcestershire Sauce: This sauce adds a lot of flavors. It's a little tangy, a little sweet, and very savory. It makes the beef taste even better.
  5. Garlic: Garlic gives a strong and tasty flavor that makes the patties taste even more delicious. It's a small touch that makes a big difference.
  6. Ground Black Pepper: Pepper adds a bit of spice, but not too much. It's just enough to give a slight kick and make the flavors pop.
  7. Salt: Salt is a basic seasoning that makes everything taste more like itself. It brings out the meaty flavor of the beef and balances the dish.
  8. Baby Bella Mushrooms: These mushrooms go in the sauce and add a rich, earthy taste. They also make the sauce thicker and more interesting.
  9. All-Purpose Flour: Flour thickens the sauce so it's not too runny. It makes sure the sauce coats the patties nicely and has a good texture.
  10. Condensed French Onion Soup: This adds a deep, oniony flavor to the sauce without you having to chop a bunch of onions. It's a shortcut to lots of tastes.
  11. Beef Consommé: This is a clear beef broth that makes the sauce taste even more meaty and rich. It adds depth and richness to the sauce.

How to make Paula Deen Salisbury steak

Start by taking a large mixing bowl and combining your ground beef with the dry bread crumbs. These crumbs are essential as they help your patties stick together. Next, add a lightly beaten egg into the mix. The egg acts as a binding agent, holding all your ingredients together. Pour in the Worcestershire sauce for that deep, savory flavor, and don't forget the minced garlic for a punch of aroma. Season the mixture with black pepper and salt for taste.

After mixing these ingredients well, it's time to shape your mixture into patties. Aim for six even portions, rolling each into a ball before flattening them into patties about 4 inches wide. Heat your skillet over a medium flame and cook the patties.

They should spend about 7 to 8 minutes on each side until they've developed a nice brown crust. If your skillet can't hold all the patties at once, don't worry, just cook them in batches. Once done, set them aside on a plate and keep them warm.

In the same skillet used for the patties, add your sliced mushrooms to the leftover beef drippings. Stir them around and let them cook until they're just soft, which should take about 1 to 2 minutes.

Then, add the flour to help thicken your sauce. Cook this mixture for another 2 minutes, then pour in the condensed French onion soup and beef consommé. Stir everything well to combine, making sure to scrape any tasty bits from the bottom of the skillet.

Bring your cooked patties back to the skillet, placing them into the bubbling sauce. Lower the heat to a simmer and let it cook uncovered for 30 to 40 minutes. During this time, the sauce will thicken, and the patties will become wonderfully tender. Feel free to spoon some of the sauce over the patties occasionally to enhance their flavor.

After the patties are thoroughly cooked and the sauce has thickened, your Salisbury steak is ready to serve. Place each patty on a plate and generously top with the mushroom and onion sauce.

paula deen salisbury steaks with green peas and mashed potatoes on the plate

Variations

Turkey Salisbury Steak: Substitute ground beef with ground turkey for a lighter version of the classic dish​​.

Mushroom-Free Gravy: For those who don't like mushrooms, consider making the gravy without them or substituting with another vegetable like onions or bell peppers for added flavor​​.

Gluten-Free Option: Use gluten-free breadcrumbs and ensure all other ingredients, like Worcestershire sauce and beef broth, are gluten-free to cater to dietary restrictions​​.

Vegetarian Salisbury Steak: Use a meat substitute such as lentils or a commercially available plant-based ground meat product, and vegetable broth instead of beef consommé for a vegetarian version​​.

Creamy Gravy Variation: Add a splash of cream or sour cream to the gravy for a richer, creamier sauce​​.

Spicy Salisbury Steak: Incorporate chopped jalapeños or a dash of cayenne pepper into the beef mixture for a kick of heat​​.

Herbed Salisbury Steak: Mix fresh herbs like thyme, rosemary, or parsley into the ground beef mixture for an aromatic twist

Serving suggestions

Serving suggestions include classic sides like mashed potatoes, but the dish can also be served over rice or egg noodles. For a healthier twist, consider serving it with a side of steamed vegetables​​.

For those interested in exploring variations, incorporating ingredients like soy sauce or Dijon mustard into the gravy can add depth of flavor, and using different types of mushrooms or adding a splash of cream can elevate the dish even further​​.

Leftovers and reheating

Store leftover Salisbury steak in the air tight container in the fridge for up to 4 days. Reheat when needed in the microwave, 1 minute should be enough to warm the food.

Frequentky asked questions

Can Salisbury steak be made ahead of time?

Yes, you can prepare Salisbury steak ahead of time by shaping the patties and even cooking them partially or fully before refrigerating. The gravy can also be prepared in advance. Simply reheat everything together when ready to serve​​.

Can I freeze Salisbury steak?

Yes, Salisbury steak freezes well. Cool the cooked patties and gravy completely before transferring them to freezer-safe containers. They can be frozen for up to 3 months. Thaw in the refrigerator overnight and reheat before serving​​.

How can I make the gravy thicker or thinner?

To thicken the gravy, you can cook it longer or add a bit more flour mixed with water (a slurry) to reach the desired consistency. To thin it out, simply stir in additional beef broth or water until it's as thin as you like​​.

You may also like

  • Air fryer buffalo chicken thighs
  • Ina Garten chicken marsala
  • Vegan funeral potatoes
  • Athletic greens recipe
  • Acorn squash hummus

Hope you will like this Paula Deen Salisbury steak copycat recipe as much as we do. Rate the recipe if you made it and leave a comment below if you have any questions or suggestions.

Yield: 4

Paula Deen Salisbury Steak

paula deen salisbury steaks with green peas and mashed potatoes on the plate

Paula Deen Salisbury steak copycat recipe is perfect for a weeknight dinner but can also be dressed up for a more formal meal. It's a testament to the power of simple ingredients, coming together to create a dish that's hearty, flavorful, and deeply satisfying.

Prep Time 5 minutes
Cook Time 1 hour
Total Time 5 minutes

Ingredients

  • 2 pounds ground beef
  • ½ cup dry bread crumbs
  • 1 large egg, lightly beaten
  • 2 tablespoons Worcestershire sauce
  • 2 cloves garlic, minced
  • 2½ teaspoons ground black pepper
  • ¼ teaspoon salt
  • 1 (8-ounce) package sliced baby bella mushrooms
  • 2 tablespoons all-purpose flour
  • 1 (10½-ounce) can condensed French onion soup
  • 1 (10½-ounce) can beef consommé

Instructions

  1. Mix ground beef, bread crumbs, egg, Worcestershire sauce, garlic, pepper, and salt in a large bowl until well combined. Shape into 6 four-inch patties.
  2. Heat a skillet over medium heat. Cook patties 7-8 minutes per side until browned. Remove patties and keep warm.
  3. In the same skillet, cook mushrooms for 1-2 minutes until tender. Stir in flour and onion soup for 2 minutes. Add consommé and mix well.
  4. Put patties back in the skillet. Bring to a boil, then simmer uncovered for 30-40 minutes until patties are cooked through and sauce thickens.
  5. Serve the patties hot with the mushroom and onion sauce.

Notes

Serving suggestions include classic sides like mashed potatoes, but the dish can also be served over rice or egg noodles. For a healthier twist, consider serving it with a side of steamed vegetables​​.

For those interested in exploring variations, incorporating ingredients like soy sauce or Dijon mustard into the gravy can add depth of flavor, and using different types of mushrooms or adding a splash of cream can elevate the dish even further​​.

© Tanya
Cuisine: American / Category: Copycat recipes

Filed Under: Copycat recipes

Nichupté Lagoon

September 9, 2023 by Tanya Leave a Comment

When you think of Cancún, you might first picture long stretches of golden beaches and the clear blue waters of the Caribbean Sea. But there's another watery wonder that often gets overlooked: the Nichupté Lagoon.

This magical spot, just a stone's throw from the bustling Hotel Zone, is a must-visit for anyone wanting to experience a different side of Cancún. Cancún street art is another great place to be.

pink side building next to the ocean front

What is the Nichupté Lagoon?

The Nichupté Lagoon is a massive body of water that's like a maze of waterways, mangroves, and islands. It's spread out over 3,000 hectares, which is pretty big! The cool thing is, it's not just one lagoon but a system of seven lagoons all connected. And guess what? It's brimming with life.

Wildlife Wonders

One of the biggest treats of visiting the lagoon is the chance to see so many animals in their natural homes. Birds, crocodiles, and even leopard frogs are just a few of the creatures that call the lagoon home. And the waters? They're filled with all sorts of fish. If you're lucky, you might even spot a dolphin or two!

Fun Things to Do

1. Boating Tours One of the best ways to explore the vast lagoon is on a boating tour. With experienced guides, you'll weave through the many canals and waterways. They'll tell you stories of the lagoon’s history, its importance to Cancún, and point out wildlife that you might miss on your own.

2. Kayaking Adventures For those wanting a more hands-on experience, kayaking is perfect. Paddle through the mangrove channels. The calm waters make it suitable even for beginners. Plus, the feeling of gliding quietly through nature is truly magical.

3. Jet Skiing Thrills If you're looking for a bit more adrenaline, rent a jet ski. Zipping around the lagoon, with the wind in your hair, is exhilarating. Just remember to respect the no-wake zones which protect wildlife habitats.

4. Bird Watching Nichupté Lagoon is a haven for birdwatchers. From flamingos to pelicans and herons, you're bound to spot a wide variety of avian life. Bring a pair of binoculars, and perhaps a guidebook, and enjoy the colorful spectacle.

5. Fishing Trips The lagoon is rich with marine life. Whether you're an experienced angler or a first-timer, local fishing tours provide everything you need. They'll guide you to the best spots, and you might catch a snook or tarpon!

6. Sunset Cruises After a day of adventure, what's better than a serene sunset cruise? As the sun dips below the horizon, the lagoon turns into a canvas of orange and pink. Some cruises even offer dinner onboard, making for a perfect romantic evening or a chill night with friends.

7. Mangrove Exploration The mangrove forests of Nichupté are vital for the local ecosystem. They act as breeding grounds for many fish species and protect the shoreline from erosion. Walking or canoeing through these areas gives you a close look at this unique environment.

8. Snorkeling Spots Though Cancún's reefs are more famous, Nichupté Lagoon offers its own snorkeling adventures. Dive in to see a different side of marine life. The clear waters offer good visibility, and you'll discover fish species that prefer the calmer lagoon waters.

For those who love to fish, the lagoon is a dream spot. You can catch snook, sea bass, and tarpon. Just remember, some areas are protected, so always check where you can fish.

Nichupté Lagoon and clear water

Mangroves and More

The lagoon isn't just water. It's surrounded by mangroves, which are trees that grow in water. These trees are super important because they protect the coastline from storms and give little fish places to hide. Walking through the mangrove forests feels like stepping into another world. The sounds of chirping birds and the gentle splash of water make it a peaceful experience.

Why Nichupté Lagoon Matters

Apart from being a fun place to hang out, Nichupté Lagoon plays a big role in keeping Cancún beautiful. It acts like a filter, cleaning the water that runs off the land before it goes into the sea. This helps keep the coral reefs healthy. The mangroves, as mentioned, also protect the coast.

A Few Tips Before You Go

If you're planning to visit Nichupté Lagoon, here are a few things to keep in mind:

  • Respect the wildlife. Remember, it's their home.
  • If you're going on a boat tour, take some sunscreen and a hat. The sun can get pretty strong.
  • Always listen to guides, especially if you're doing activities like jet skiing or kayaking. They know the area best.

Nichupté Lagoon is one of Cancún's hidden treasures. It's a place of beauty, adventure, and nature. So, the next time you're in Cancún, make sure to take a day to explore this incredible spot. You'll come away with memories that last a lifetime.

Filed Under: Mexico, Travel

Cancún street art

September 9, 2023 by Tanya Leave a Comment

Cancún, typically synonymous with pristine beaches, all-inclusive resorts, and thrilling nightlife, has a secret wonder woven amidst its bustling streets — a vivid tapestry of street art. A journey through Downtown Cancún offers a different kind of sensory experience, where urban walls speak volumes, narrating tales of the city's rich past, present aspirations, and dreams for the future.

History meets modernity- Cancun street art

Historically, the art of the Mayans adorned temples, pottery, and manuscripts, telling tales of their gods, daily life, and celestial events. This intrinsic value of art to convey stories has continued in a modern form. Today, local and international artists use Cancún’s walls as their canvas, linking ancient Mayan tales with contemporary themes, showcasing a mix of the city's roots and its global influences.

The street art of Cancún is not just about aesthetic appeal; it’s a reflection of society. Artists have used their work to shed light on global issues such as climate change, human rights, and cultural preservation. These murals provoke thought, inspire change, and provide an essential platform for voices that often go unheard.

cancun street art

A Walking Tour of Cancún’s Street Art

Venturing out of the Hotel Zone and stepping into Downtown Cancún, you find yourself amid a visual feast. Each corner turned reveals another mural, each more mesmerizing than the last. Some artworks stretch several stories high, looming over the streets, demanding attention and reverence.

One such compelling piece depicts a Mayan warrior, juxtaposed with modern symbols, challenging viewers to find the harmony between past traditions and present advancements. Another portrays the vibrant marine life of Cancún’s waters, reminding locals and visitors of nature’s beauty and the responsibility to protect it.

A common motif in many artworks is the representation of powerful, resilient women, both from history and folklore, symbolizing strength, beauty, and hope. These women, painted with vibrant colors, often have a gaze that’s fixed on the horizon, perhaps hinting at a brighter, more equitable future.

International Meets Local - The Collaboration

Cancun street art scene is not limited to local talent. Cancún has hosted international artists, drawn to the city for its cultural richness and the opportunity to contribute to its urban gallery. This amalgamation of local and global perspectives has resulted in a diverse range of styles and narratives.

Often, visiting artists collaborate with local talents, leading to a fusion of techniques and ideas. These collaborations not only enhance the artistic richness of the city but also foster a sense of global community and shared human experience.

Impact on the Community

The surge of street art has reshaped the urban landscape of Cancún. What were once forgotten, drab walls are now vibrant masterpieces that instill pride within the community. They've transformed mundane daily commutes into immersive artistic experiences, making art accessible to everyone, regardless of their socioeconomic status.

For local businesses, the murals have become an attraction, drawing both tourists and locals. The colorful streets are now bustling hubs of activity, with cafes, shops, and markets benefiting from the foot traffic.

Furthermore, the street art has provided an opportunity for local youths. Several initiatives and workshops teach the young generation about art, offering them a constructive outlet for self-expression and a way to contribute positively to their community.

The street art of Cancún is a testament to the city's evolving identity. It’s a harmonious blend of its rich historical roots with its contemporary aspirations. While the azure waters and sandy beaches of Cancún remain its primary allure for many, the city’s vibrant streets offer a depth of experience that’s unparalleled. For those willing to venture beyond the typical tourist paths, Cancún promises a journey through a living gallery, where every wall has a story to tell.

Filed Under: Mexico, Travel

Ina Garten chicken marsala

March 17, 2023 by Tanya Leave a Comment

Ina Garten chicken marsala recipe is a delicious and easy-to-make dish that is perfect for a weeknight dinner or a special occasion. With its flavorful sauce and tender chicken, it's sure to become a family favorite.

chicken marsala ina garten recipe

Ina Garten, also known as the Barefoot Contessa, is a renowned American chef and author known for her elegant and approachable recipes. Her chicken marsala recipe is a classic Italian-American dish that is both delicious and easy to make. In this article, we will go over Ina Garten's chicken marsala recipe, some frequently asked questions about the dish, and how to store and reheat leftovers.

Ingredients

  • Boneless, skinless chicken breasts: Chicken breasts are the primary protein in this dish. Boneless, skinless chicken breasts are used to make it easier to cook and serve.
  • All-purpose flour: The flour is used to dredge the chicken before sautéing. This helps to create a crispy outer layer on the chicken and helps the sauce to stick to the chicken.
  • Kosher salt and freshly ground black pepper: These are used to season the flour mixture and the chicken.
  • Olive oil: The olive oil is used to sauté the chicken and to cook the shallots and mushrooms for the sauce.
  • Unsalted butter: The butter is used to add richness and flavor to the sauce.
  • Shallots: Shallots are used to add flavor to the sauce. They have a milder and sweeter taste compared to onions.
  • Mushrooms: Mushrooms are also used to add flavor and texture to the sauce. They absorb the flavors of the wine and chicken stock and give the sauce a meaty taste.
  • Marsala wine: Marsala wine is a fortified wine from Sicily that adds a sweet and nutty flavor to the sauce. The wine also helps to tenderize the chicken and adds depth to the sauce.
  • Chicken stock: The chicken stock is used to thin out the sauce and add more flavor to it.
  • Fresh flat-leaf parsley: The parsley is used as a garnish to add a pop of color and freshness to the dish.

How to make chicken marsala Ina Garten recipe

Here's a brief description of how to make this recipe:

  1. Season the chicken breasts with salt and pepper.
  2. Dredge the chicken in flour and shake off any excess.
  3. Sauté the chicken in olive oil until browned, then transfer to a baking dish and bake in the oven.
  4. In the same pan, sauté chopped shallots and sliced mushrooms in butter until tender.
  5. Add Marsala wine and chicken stock to the pan, and simmer until the sauce is slightly thickened.
  6. Spoon the sauce over the chicken and garnish with chopped parsley.
  7. Serve hot with a side of pasta, rice, or vegetables.

Frequently asked questions

Can I use chicken thighs instead of chicken breasts?

Yes, you can use chicken thighs instead of chicken breasts in this recipe. Just be sure to adjust the cooking time accordingly, as thighs may take longer to cook than breasts.

Can I make this recipe ahead of time?

Yes, you can make this recipe ahead of time. You can prepare the chicken and sauce separately and then combine them just before serving. Store the chicken and sauce separately in the refrigerator and reheat in a pan over medium heat until warmed through.

Can I freeze leftovers?

Yes, you can freeze leftovers for up to 3 months. To freeze, let the chicken and sauce cool to room temperature, then transfer to a freezer-safe container or plastic bag. Thaw the chicken and sauce overnight in the refrigerator before reheating.

chicken and mushroom sauce dish on the white plate

Serving suggestions

  • Pasta: A classic side dish for chicken marsala is pasta. Fettuccine or linguine are great choices to soak up the delicious sauce. You can also use penne, rigatoni, or spaghetti.
  • Rice: Another popular side dish for chicken marsala is rice. You can use white rice, brown rice, or wild rice. Cook the rice according to the package instructions and season it with butter, salt, and pepper.
  • Vegetables: To add some freshness and color to the meal, consider serving the chicken marsala with a side of sautéed or roasted vegetables. Some great options include asparagus, green beans, carrots, or broccoli.
  • Salad: A simple salad with mixed greens, cherry tomatoes, and a vinaigrette dressing can provide a refreshing contrast to the rich chicken marsala. You can also add some shaved Parmesan cheese or toasted pine nuts for added flavor and texture.
  • Bread: A slice of crusty bread can be a great accompaniment to the chicken marsala. Use a baguette, ciabatta, or sourdough bread to soak up the sauce and add some texture to the meal.
  • Potatoes: Creamy mashed potatoes can be a great side dish to complement the rich and savory flavors of the chicken marsala. You can also serve roasted or baked potatoes seasoned with garlic, rosemary, or thyme.
  • Polenta: Creamy polenta is another great side dish for chicken marsala. Cook the polenta according to the package instructions and season it with butter, salt, and pepper. You can also add some Parmesan cheese or chopped fresh herbs for added flavor.
  • Wine: A glass of wine can be a perfect accompaniment to the chicken marsala. Marsala wine, which is used in the recipe, is an obvious choice. Alternatively, you can serve a dry white wine such as Chardonnay, Pinot Grigio, or Sauvignon Blanc. For red wine lovers, a medium-bodied red such as Pinot Noir or Sangiovese can also pair well.
  • Dessert: Finish the meal with a delicious dessert that complements the flavors of the chicken marsala. A classic Italian tiramisu, creamy panna cotta, or a warm apple tart can be great choices.

Storage and leftovers

To store leftovers, place the chicken and sauce in an airtight container and refrigerate for up to 3 days. To reheat, transfer the chicken and sauce to a pan and heat over medium heat until warmed through, adding a splash of chicken stock or water to thin out the sauce if necessary.

You can also freeze leftovers for up to 3 months. To freeze, let the chicken and sauce cool to room temperature, then transfer to a freezer-safe container or plastic bag. Thaw the chicken and sauce overnight in the refrigerator before reheating.

In addition to reheating leftovers, you can also repurpose them into new meals. For example, you can shred the chicken and use it in sandwiches, salads, or wraps. Or you can use the leftover sauce as a topping for pasta, rice, or vegetables.

You may also like...

  • Acorn squash hummus
  • Athletic greens recipe
  • Vegan funeral potatoes

Hope you will like this chicken marsala Ina Garten recipe as much as we do. Rate the recipe if you made it and leave a comment below if you have any questions or suggestions.

Yield: 4

Ina Garten chicken marsala

chicken marsala ina garten recipe with chopped cilantro

Ina Garten chicken marsala recipe is a delicious and easy-to-make dish that is perfect for a weeknight dinner or a special occasion. With its flavorful sauce and tender chicken, it's sure to become a family favorite.

Prep Time 5 minutes
Cook Time 40 minutes
Total Time 40 minutes

Ingredients

  • 2 split (1 whole) boneless, skinless chicken breasts
  • 1/2 cup all-purpose flour
  • Kosher salt and freshly ground black pepper
  • 1/4 cup olive oil
  • 4 tablespoons unsalted butter
  • 1/2 cup chopped shallots (2 large)
  • 8 ounces sliced mushrooms
  • 1 cup Marsala wine
  • 1 cup chicken stock
  • 2 tablespoons chopped fresh flat-leaf parsley

Instructions

  1. Preheat the oven to 375 degrees F.
  2. Place the flour in a shallow bowl and season with salt and pepper.
  3. Heat the olive oil in a large sauté pan over medium-high heat.
  4. Dredge the chicken in the flour mixture, shaking off any excess.
  5. Sauté the chicken in the pan for 2 to 3 minutes on each side, until browned.
  6. Transfer the chicken to a baking dish and bake for 15 minutes, until cooked through.
  7. Meanwhile, in the same pan, melt the butter and add the shallots and mushrooms.
  8. Sauté for 5 to 7 minutes, until the vegetables are tender.
  9. Add the Marsala wine and chicken stock and bring to a boil.
  10. Lower the heat and simmer for 10 minutes, until the sauce is reduced and slightly thickened.
  11. Spoon the sauce over the chicken and sprinkle with parsley.

Notes

To store leftovers, place the chicken and sauce in an airtight container and refrigerate for up to 3 days. To reheat, transfer the chicken and sauce to a pan and heat over medium heat until warmed through, adding a splash of chicken stock or water to thin out the sauce if necessary.

You can also freeze leftovers for up to 3 months. To freeze, let the chicken and sauce cool to room temperature, then transfer to a freezer-safe container or plastic bag. Thaw the chicken and sauce overnight in the refrigerator before reheating.

© Tanya
Cuisine: American / Category: Copycat recipes

Filed Under: Copycat recipes, Food, Recipes

Acorn squash hummus

March 17, 2023 by Tanya Leave a Comment

Acorn squash hummus recipe is all you want at any time of the year, not only fall! This twist on traditional hummus takes the classic chickpea spread and adds a touch of natural sweetness and warmth from the roasted acorn squash. The result is a delightful combination of flavors that will leave your taste buds dancing and your stomach satisfied.

acorn squash hummus in the black bowl with rosemary

As the weather starts to cool down and the leaves change color, I can't help but get excited about all the delicious seasonal produce that becomes available. One of my favorite autumn ingredients is acorn squash, and I have been experimenting with creative ways to incorporate it into my meals.

One of my latest culinary discoveries is Acorn Squash Hummus, and let me tell you, it's an absolute game-changer!

Acorn squash is not only delicious, but it's also packed with essential nutrients like vitamin A, vitamin C, and potassium. By incorporating it into hummus, you're creating a nutrient-dense, protein-rich snack that's perfect for any occasion.

Recipe ingredients

  1. Acorn Squash: A type of winter squash with a green exterior and orange flesh, it is a nutritious ingredient that adds flavor, texture, and creaminess to the hummus.
  2. Chickpeas: Also known as garbanzo beans, they are a legume that is high in protein, fiber, and other essential nutrients. They provide a creamy and hearty texture to the hummus.
  3. Tahini: A paste made from ground sesame seeds, it adds a nutty flavor and a creamy texture to the hummus.
  4. Garlic: A pungent and flavorful ingredient that adds depth of flavor and a spicy kick to the hummus.
  5. Lemon Juice: A sour and acidic ingredient that provides a tangy flavor to the hummus.
  6. Cumin: A spice with a warm and earthy flavor, it adds a smoky and aromatic quality to the hummus.
  7. Smoked Paprika: A spice made from dried and smoked red peppers, it adds a smoky and slightly sweet flavor to the hummus.
  8. Salt and Pepper: Common seasonings that enhance the natural flavors of the hummus and provide balance and depth of flavor.
  9. Olive Oil: A healthy fat that provides a rich and smooth texture to the hummus, and also helps to thin it out if needed.

By using a combination of these ingredients, the acorn squash hummus recipe provides a delicious and nutritious dish that is perfect for dipping or spreading on crackers, pita bread, or vegetables.

How to make acorn squash hummus (overview)

  1. Roast acorn squash: Cut the squash in half, scoop out the seeds, and roast it in the oven until it's tender and caramelized. Once it's cooled, scoop the flesh out and set it aside.
  2. Prepare chickpeas: Drain and rinse canned chickpeas, or cook dried chickpeas according to package instructions. If you prefer a smoother texture, consider removing the skins from the chickpeas.
  3. Blend it all together: In a food processor or blender, combine the roasted acorn squash, chickpeas, tahini, lemon juice, garlic, and spices like cumin, paprika, and salt. Blend until smooth and creamy, adjusting the consistency with olive oil or water as needed.
  4. Serve and enjoy: Transfer your Acorn Squash Hummus to a serving bowl, drizzle with olive oil, and sprinkle with your choice of garnishes like chopped parsley, roasted pepitas, or a dash of paprika. Serve with your favorite dippers like pita chips, raw veggies, or crackers.
whole raw acorn squash

Frequently asked questions

What does Acorn Squash Hummus taste like?

Acorn Squash Hummus has a unique flavor profile, blending the natural sweetness and earthiness of roasted acorn squash with the creamy, nutty taste of traditional hummus. The combination of ingredients creates a slightly sweet, rich, and savory spread that is both delicious and satisfying.

Can I use a different type of squash instead of acorn squash?

Yes, you can substitute other types of winter squash, such as butternut or kabocha, for acorn squash. Keep in mind that different squash varieties have slightly different flavors and textures, so your hummus may taste different depending on the squash you choose.

Can I make Acorn Squash Hummus without tahini?

While tahini is a key ingredient in traditional hummus, you can make Acorn Squash Hummus without it. You can substitute other nut or seed butters, like almond or sunflower seed butter, or you can simply omit the tahini altogether. Just be aware that the final texture and flavor may vary from the original recipe.

Is Acorn Squash Hummus vegan and gluten-free?

Yes, Acorn Squash Hummus is naturally vegan and gluten-free, as it contains no animal products or gluten-containing ingredients. However, if you have specific dietary restrictions, always check the labels of store-bought ingredients like tahini and spices to ensure they meet your dietary needs.

Can I freeze Acorn Squash Hummus?

Yes, you can freeze Acorn Squash Hummus in an airtight, freezer-safe container for up to 2-3 months. Thaw it in the refrigerator overnight before serving. Note that the texture may change slightly after freezing, so you might need to give it a good stir to bring it back to its original consistency.

Storage instructions

  1. Let the hummus cool completely before storing it. Leaving it at room temperature for more than 2 hours can cause bacterial growth and spoilage.
  2. Transfer the leftover hummus to an airtight container or a covered bowl.
  3. Place the container in the refrigerator and store for up to 4-5 days.
  4. When ready to serve, take the hummus out of the refrigerator and let it come to room temperature for 10-15 minutes before serving.
  5. Give the hummus a quick stir to ensure that the consistency is even.

Note: The olive oil in the hummus may solidify when refrigerated, causing the texture to become thicker. If this happens, simply let the hummus sit at room temperature for a few minutes and give it a quick stir before serving. If the hummus seems too thick, you can add a little bit of water or olive oil to thin it out to your desired consistency.

By following these storage instructions, you can keep your acorn squash hummus fresh and delicious for several days, making it a great make-ahead option for snacks or meals.

More recipes

  • Vegan funeral potatoes
  • Athletic greens recipe

Hope you will like this acorn squash hummus recipe as much as we do. Please rate the recipe if you made it and leave a comment below if you have questions or suggestions.

Yield: 4

Acorn squash hummus

acorn squash hummus

Acorn squash hummus recipe is all you want at any time of the year, not only fall! This twist on traditional hummus takes the classic chickpea spread and adds a touch of natural sweetness and warmth from the roasted acorn squash. The result is a delightful combination of flavors that will leave your taste buds dancing and your stomach satisfied.

Prep Time 5 minutes
Cook Time 40 minutes
Total Time 40 minutes

Ingredients

  • 1 medium acorn squash
  • 1 can (15 oz) chickpeas, drained and rinsed
  • 1/4 cup tahini
  • 2 garlic cloves, minced
  • Juice of 1 lemon
  • 1 tsp ground cumin
  • 1/4 tsp smoked paprika
  • Salt and pepper, to taste
  • 2-4 tbsp olive oil
  • Water, as needed

Instructions

  1. Preheat the oven to 375°F (190°C).
  2. Cut the acorn squash in half and scoop out the seeds.
  3. Place the squash halves cut-side down on a baking sheet and bake for 30-40 minutes, or until the squash is tender.
  4. Remove the squash from the oven and let it cool for a few minutes.
  5. Scoop the flesh out of the squash and add it to a food processor or blender.
  6. Add the chickpeas, tahini, garlic, lemon juice, cumin, smoked paprika, salt, and pepper to the food processor or blender.
  7. Blend until the mixture is smooth and creamy, scraping down the sides as needed.
  8. While the food processor or blender is running, gradually add the olive oil until the hummus is smooth and creamy.
  9. If the hummus is too thick, add water 1 tablespoon at a time until it reaches your desired consistency.
  10. Taste and adjust seasoning as needed.
  11. Transfer the hummus to a serving bowl and serve with pita bread, vegetables, or crackers.

Notes

Storage instructions

  1. Let the hummus cool completely before storing it. Leaving it at room temperature for more than 2 hours can cause bacterial growth and spoilage.
  2. Transfer the leftover hummus to an airtight container or a covered bowl.
  3. Place the container in the refrigerator and store for up to 4-5 days.
  4. When ready to serve, take the hummus out of the refrigerator and let it come to room temperature for 10-15 minutes before serving.
  5. Give the hummus a quick stir to ensure that the consistency is even.

Note: The olive oil in the hummus may solidify when refrigerated, causing the texture to become thicker. If this happens, simply let the hummus sit at room temperature for a few minutes and give it a quick stir before serving. If the hummus seems too thick, you can add a little bit of water or olive oil to thin it out to your desired consistency.

By following these storage instructions, you can keep your acorn squash hummus fresh and delicious for several days, making it a great make-ahead option for snacks or meals.

© Tanya
Cuisine: American / Category: Appetizers and sides

Filed Under: Appetizers and sides, Food, Recipes

Vegan funeral potatoes

March 15, 2023 by Tanya Leave a Comment

Vegan funeral potatoes are a comforting and flavorful dish that can be enjoyed by vegans and non-vegans alike. The use of non-dairy milk, vegan butter, and vegan cheese make this dish a plant-based alternative to traditional funeral potatoes. Additionally, the use of garlic and onion powder, salt, and pepper, as well as the crispy bread crumb topping, provide a depth of flavor and texture to the dish.

vegan funeral potatoes in the baking pan

Funeral potatoes are a traditional American comfort food dish that is often served at funeral gatherings and potlucks (as a classic recipe, usually not vegan). This dish typically consists of diced potatoes that are baked with a creamy, cheesy sauce and a crispy bread crumb topping. While the origins of funeral potatoes are unclear, they have become a popular dish in the American West, particularly in the states of Utah and Idaho.

The basic ingredients of funeral potatoes typically include potatoes, butter, flour, milk, cheese, sour cream, and bread crumbs. However, the exact recipe can vary depending on personal preferences and regional variations. Some recipes call for the addition of chopped onions, garlic, or other spices to add flavor to the dish.

Ingredients

  • Potatoes: This is the main ingredient in the dish, providing a starchy and hearty base. The potatoes are peeled and diced before being boiled until they are tender.
  • Vegan Butter: This ingredient adds richness and flavor to the dish. It is melted before being used to make the sauce that coats the potatoes.
  • All-Purpose Flour: Flour is used as a thickener in the sauce. It helps to create a creamy, smooth texture that coats the potatoes evenly.
  • Garlic Powder: This ingredient adds a savory, slightly pungent flavor to the dish. It is used in small amounts to provide subtle depth of flavor.
  • Onion Powder: Similar to garlic powder, onion powder adds a savory flavor to the dish. It is used in small amounts to provide subtle depth of flavor.
  • Salt: This is a common seasoning that helps to enhance the natural flavors of the dish. It is used in small amounts to provide balance and depth of flavor.
  • Black Pepper: Similar to salt, black pepper is a common seasoning that adds a slightly spicy and pungent flavor to the dish. It is used in small amounts to provide balance and depth of flavor.
  • Non-Dairy Milk: This is used to create the creamy sauce that coats the potatoes. Unsweetened non-dairy milk, such as soy or almond milk, is used to keep the dish vegan.
  • Vegan Sour Cream: This ingredient helps to thicken the sauce and add a tangy flavor to the dish. Vegan sour cream is used to keep the dish vegan.
  • Vegan Cheddar Cheese Shreds: These are used to add a cheesy flavor to the dish. Vegan cheddar cheese shreds are made from plant-based ingredients and are used to keep the dish vegan.
  • Vegan Bread Crumbs: This ingredient is used to create a crispy and crunchy topping for the dish. Vegan bread crumbs are made from plant-based ingredients and are used to keep the dish vegan.
  • Additional Melted Vegan Butter: This is used to help the bread crumbs stick to the top of the dish and create a crispy, golden-brown topping. Vegan butter is used to keep the dish vegan.

How to make vegan funeral potatoes

  1. Preheat the oven to 375°F (190°C). Boil the diced potatoes in salted water until they are fork-tender. Drain the water and set aside.
  2. In a medium-sized saucepan, melt 1/4 cup of vegan butter over medium heat.
  3. Whisk in the flour, garlic powder, onion powder, salt, and black pepper until the mixture is smooth and bubbly.
  4. Gradually add in the non-dairy milk, whisking constantly until the mixture is thickened and smooth.
  5. Remove the saucepan from heat and stir in the vegan sour cream and vegan cheddar cheese shreds until the cheese is melted and the mixture is smooth.
  6. Fold in the cooked potatoes and mix well.
  7. Transfer the mixture to a 9x13 inch baking dish and spread it out evenly.
  8. In a small bowl, mix together the vegan bread crumbs and 2 tbsp of melted vegan butter until the crumbs are coated.
  9. Sprinkle the bread crumb mixture on top of the potato mixture.
  10. Bake for 30-35 minutes, until the top is golden brown and crispy. Let it cool for a few minutes before serving.

There are many theories about why funeral potatoes have become so popular at funerals and other gatherings. Some believe that the dish provides a comforting and familiar taste during a difficult time, while others suggest that the easy-to-prepare nature of the dish makes it a convenient option for those who are grieving. In some cases, families may even request that funeral potatoes be served at their loved one's funeral as a way to honor their memory.

Despite their association with funerals, funeral potatoes are also a popular dish for other occasions, such as potlucks, family gatherings, and holiday meals. Many families have their own special recipe for funeral potatoes that has been passed down through the generations, adding to the sense of nostalgia and comfort that the dish provides.

In recent years, vegan and vegetarian versions of funeral potatoes have become increasingly popular, as more people seek out plant-based alternatives to traditional comfort foods. Vegan funeral potatoes recipe is very easy to make and step by step instructions are provided in this post.

While vegan funeral potatoes may not be the healthiest dish, they are certainly a beloved comfort food that has stood the test of time. Whether you are cooking for a large gathering or simply looking for a tasty and comforting side dish, funeral potatoes are sure to satisfy your cravings and provide a sense of comfort and familiarity.

golden yellow casserole with chopped chives on top
Homemade Funeral Potatoes Casserole with Cheese and Chives

Leftovers

If you have leftover vegan funeral potatoes, there are several ways you can use them:

  1. Reheat and Serve: Simply reheat the potatoes in the oven or microwave and serve them as a side dish with your favorite meal.
  2. Potato Patties: Mix the leftover potatoes with some flour and form them into patties. Fry them up in a pan until they are golden brown and crispy for a tasty breakfast or snack.
  3. Potato Soup: Add the leftover potatoes to a pot with some vegetable broth and other vegetables like carrots, celery, and onions to create a delicious and hearty potato soup.
  4. Breakfast Hash: Chop up the leftover potatoes and fry them with some diced onions, peppers, and tofu or vegan sausage for a delicious breakfast hash.
  5. Shepherd's Pie: Layer the leftover potatoes with some cooked vegetables like peas and carrots, and a vegan meat substitute like lentils or tofu. Bake in the oven until the top is golden brown for a tasty and filling Shepherd's Pie.

Storage

  1. Let the potatoes cool completely before storing them. Leaving them at room temperature for more than 2 hours can cause bacterial growth and spoilage.
  2. Transfer the leftover potatoes to an airtight container or cover the baking dish tightly with plastic wrap.
  3. Place the container in the refrigerator and store for up to 3-4 days.
  4. To reheat the potatoes, preheat the oven to 350°F (175°C). If using a baking dish, remove the plastic wrap and cover the dish with foil. If using a container, transfer the potatoes to an oven-safe dish.
  5. Heat the potatoes in the oven for 20-25 minutes or until they are heated through.
  6. Serve and enjoy!

Note: The bread crumb topping may lose some of its crispiness when reheated, but the potatoes will still be delicious. If you prefer a crispy topping, you can try reheating the potatoes in the oven without covering them with foil.

You may also like...

Athletic greens recipe

Hope you will like this vegan funeral potatoes as much as we do. Please rate the recipe if you made it and leave a comment below if you have any questions or suggestions.

Yield: 5

Vegan funeral potatoes

vegan funeral potatoes in the white pan with the spoon

Vegan funeral potatoes are a comforting and flavorful dish that can be enjoyed by vegans and non-vegans alike. The use of non-dairy milk, veganbutter, and vegan cheese make this dish a plant-based alternative to traditional funeral potatoes. Additionally, the use of garlic and onion powder, salt, and pepper, as well as the crispy bread crumb topping, provide a depth of flavor and texture to the dish.

Prep Time 5 minutes
Cook Time 35 minutes
Total Time 40 minutes

Ingredients

  • 2 lbs of potatoes, peeled and diced
  • 1/4 cup vegan butter, melted
  • 1/4 cup all-purpose flour
  • 1/4 tsp garlic powder
  • 1/4 tsp onion powder
  • 1/4 tsp salt
  • 1/4 tsp black pepper
  • 2 cups unsweetened non-dairy milk (such as soy or almond milk)
  • 1 cup vegan sour cream
  • 2 cups vegan cheddar cheese shreds
  • 1 cup vegan bread crumbs
  • 2 tbsp vegan butter, melted

Instructions

  1. Preheat the oven to 375°F (190°C).
  2. Boil the diced potatoes in salted water until they are fork-tender. Drain the water and set aside.
  3. In a medium-sized saucepan, melt 1/4 cup of vegan butter over medium heat.
  4. Whisk in the flour, garlic powder, onion powder, salt, and black pepper until the mixture is smooth and bubbly.
  5. Gradually add in the non-dairy milk, whisking constantly until the mixture is thickened and smooth.
  6. Remove the saucepan from heat and stir in the vegan sour cream and vegan cheddar cheese shreds until the cheese is melted and the mixture is smooth.
  7. Fold in the cooked potatoes and mix well.
  8. Transfer the mixture to a 9x13 inch baking dish and spread it out evenly.
  9. In a small bowl, mix together the vegan bread crumbs and 2 tbsp of melted vegan butter until the crumbs are coated.
  10. Sprinkle the bread crumb mixture on top of the potato mixture.
  11. Bake for 30-35 minutes, until the top is golden brown and crispy.
  12. Let it cool for a few minutes before serving.

Notes

To store leftovers of vegan funeral potatoes, transfer them to an airtight container or cover the baking dish tightly with plastic wrap.
Store the potatoes in the refrigerator for up to 3-4 days. When reheating, preheat the oven to 350°F (175°C), and if using a baking dish, cover the dish with foil. Reheat for 20-25 minutes or until the potatoes are heated through.

© Tanya
Cuisine: American / Category: Recipes

Filed Under: Food, Recipes

Athletic greens recipe

February 28, 2023 by Tanya Leave a Comment

If you're looking for a way to save money on nutritional supplements, making your own homemade version of Athletic Greens can be a great option. While the commercial product is convenient and effective, it can also be quite expensive. In this guide, we'll take a closer look at how to make homemade Athletic Greens and what ingredients you'll need to get started.

homemade athletic green in the cup

What are Athletic Greens?

Athletic Greens is a popular nutritional supplement that is designed to provide a comprehensive blend of vitamins, minerals, antioxidants, and other beneficial nutrients. The supplement is intended to support overall health and wellness, and it has become a popular choice among athletes, health enthusiasts, and anyone looking to boost their nutrient intake.

The Benefits of Homemade Athletic Greens

Making your own homemade version of Athletic Greens recipe has several benefits, including:

  1. Cost Savings: The commercial product can be quite expensive, so making your own version can save you money in the long run.
  2. Customization: Making your own Athletic Greens mix allows you to customize the ingredients to your specific nutritional needs and preferences.
  3. Freshness: By making your own mix, you can ensure that the ingredients are fresh and haven't been sitting on a shelf for an extended period of time.

Recipe Ingredients

To make homemade Athletic Greens, you'll need a variety of nutrient-dense ingredients, such as leafy greens, superfoods, fruits, and vegetables. Here are some examples of ingredients you might include:

  1. Leafy Greens: Leafy greens are rich in vitamins, minerals, and antioxidants, and they can add a refreshing, green flavor to your homemade Athletic Greens mix. Some examples of leafy greens you might use include spinach, kale, collard greens, and parsley.
  2. Superfoods: Superfoods are nutrient-dense foods that are rich in antioxidants, vitamins, and minerals. Some examples of superfoods you might include in your homemade Athletic Greens mix include spirulina, chlorella, wheatgrass, and maca powder.
  3. Fruits and Vegetables: Fruits and vegetables are also rich in vitamins, minerals, and antioxidants, and they can add a sweet or tangy flavor to your homemade Athletic Greens mix. Some examples of fruits and vegetables you might use include berries, citrus fruits, carrots, and beets.
  4. Protein Powders: If you're looking to add more protein to your homemade Athletic Greens mix, you can also include a protein powder of your choice. Some options include whey protein, plant-based protein, or collagen peptides.

How to make Athletic Greens

To make the mix, start by selecting the ingredients you'd like to include based on their nutritional value and flavor profile. Once you have your ingredients, you'll need a high-speed blender to ensure that everything is fully blended and smooth. Add all of the ingredients to the blender and blend until smooth. You may need to add some water or another liquid to help the ingredients blend properly.

Can I customize the ingredients in my homemade Athletic Greens mix?

Yes, one of the benefits of making your own Athletic Greens mix is that you can customize the ingredients to meet your specific nutritional needs and preferences. Experiment with different superfoods, fruits, and vegetables to find a combination that works best for you.

How do I blend the ingredients for homemade Athletic Greens?

To make homemade Athletic Greens, you'll need a high-speed blender to ensure that the ingredients are fully blended and smooth. Add all of the ingredients to the blender and blend until smooth. You may need to add some water or another liquid to help the ingredients blend properly.

What ingredients do I need to make homemade Athletic Greens?

To make a homemade version of Athletic Greens, you'll need a variety of nutrient-dense ingredients, such as superfoods like spirulina, chlorella, and wheatgrass, as well as other vitamins, minerals, and antioxidants. Some examples of ingredients you might include are kale, spinach, parsley, ginger, turmeric, and berries.

Serving and Storage

When it comes to serving size, it's best to start with a small amount and gradually increase as you become accustomed to the taste and texture. You can mix the homemade Athletic Greens with water or your preferred beverage and enjoy it as a nutritious and refreshing drink.

Leftover homemade Athletic Greens can be stored in the refrigerator for a few days, but it's best to consume it as soon as possible to ensure maximum freshness and nutrient content.

While making your own homemade Athletic Greens mix can be a fun and rewarding project, it's important to remember that homemade versions may not be as nutritionally balanced or well-rounded as the commercial product. It's always a good idea to consult with a healthcare professional before starting any new supplement regimen, and to continue eating a varied and balanced diet to ensure that you're

Yield: 2

Athletic greens recipe

Athletic greens blended drink in the cup

If you're looking for a way to save money on nutritional supplements, making your own homemade version of Athletic Greens can be a great option. While the commercial product is convenient and effective, it can also be quite expensive. In this guide, we'll take a closer look at how to make homemade Athletic Greens and what ingredients you'll need to get started.

Prep Time 5 minutes
Cook Time 5 minutes
Total Time 5 minutes

Ingredients

  • 1 cup of fresh spinach
  • 1 cup of fresh kale
  • 1/2 cup of frozen blueberries
  • 1/2 cup of frozen pineapple
  • 1 tablespoon of chia seeds
  • 1 tablespoon of flax seeds
  • 1 tablespoon of hemp seeds
  • 1/2 teaspoon of spirulina powder
  • 1/2 teaspoon of chlorella powder
  • 1/2 teaspoon of turmeric powder
  • 1/2 teaspoon of ginger powder
  • 1 tablespoon of apple cider vinegar
  • 1 tablespoon of honey (optional)
  • 2 cups of water

Instructions

  1. Add the fresh spinach and kale , frozen blueberries and pineapple to a blender.
  2. Add the chia seeds, flax seeds, hemp seeds, spirulina powder, chlorella powder, turmeric powder, and ginger powder to the blender.
  3. Add the apple cider vinegar and honey (if using) to the blender.
  4. Add 2 cups of water to the blender. Blend until smooth.
  5. Pour the mixture through a fine mesh strainer to remove any large pieces of seeds or fibers.
  6. Transfer the strained liquid to a container with a tight-fitting lid and store in the refrigerator for up to 5 days.
  7. Shake the container before drinking to ensure that all the ingredients are well mixed.
  8. Drink 1-2 servings of the homemade Athletic Greens per day to support your overall health and wellness.
© Tanya
Cuisine: American / Category: Food

Filed Under: Food, Recipes

Primary Sidebar

Recent Posts

  • Paula Deen Salisbury steak copycat recipe
  • Nichupté Lagoon
  • Cancún street art
  • Ina Garten chicken marsala
  • Acorn squash hummus

Recent Comments

No comments to show.

Copyright © 2025 Modern Life Daily on the Foodie Pro Theme